Tracking From the Grave: How Apps Follow Your Location After They're Killed
The one idea to hold in your head
A background location app does NOT stay running the whole time. It cannot. Both Android and iOS will kill it. So instead of staying alive, it hands a few smart triggers to the phone's operating system and then lets itself die. The OS keeps those triggers and wakes the app back up at exactly the right second. Accuracy does not come from running 24x7. It comes from being clever about WHEN to wake up and switch on GPS.
Read that twice. Once you accept that the app is supposed to die, everything else makes sense. Beginners usually assume the app is secretly running in a corner forever. It is not. It is mostly dead, and that is the whole trick.
Before you start: there are three ways to build this
This blog covers all three, so pick the one that fits you before you follow the code.
The plugin way (
flutter_background_geolocation), covered in "Step by step: build this yourself in Flutter". Fastest to ship and the best battery behaviour. It is a paid plugin from Transistorsoft, free in debug builds, but a release build needs a license key tied to your package id or bundle id.The Dart-only way (
geolocatorplus your own foreground service), covered in the teardown section. Free, simpler, but weaker at surviving a force quit.The native way (your own Kotlin and Swift code over method and event channels), also in the teardown section. Free, most control, most work.
So if you are building your own tracking from scratch, options 2 and 3 need no license key at all. The key is only for option 1.
Why you cannot just keep the app running
Imagine if any app could run GPS forever in the background. Your battery would be gone by lunch, and every shady app would be following you around. So phone makers put a hard stop on it. Two things happen:
The OS kills background apps. When your phone needs memory, or you swipe the app away, or it just decides your app has been idle too long, the operating system shuts your app down. You do not get a vote.
GPS is expensive. The GPS chip is one of the hungriest things on the phone. Keep it on continuously and the battery melts.
So the plugin works WITH these rules instead of fighting them. It assumes it will be killed, and it plans for resurrection. Think of it like leaving a note for a friend that says "wake me up when I cross this line." You can go to sleep. The friend (the OS) holds the note and shakes you awake at the right moment.
The heart of it: be lazy to be accurate
Here is the clever bit that makes both battery life AND accuracy possible at the same time. It sounds backwards but stay with me.
When you are standing still, GPS is turned OFF. The app drops an invisible circle around your current spot (this circle is called a geofence) and goes to sleep. The phone uses almost no battery. The app process can even die. Nobody cares, because nothing is moving.
The moment you start moving and step outside that circle, the OS notices and wakes the app up. Now the app turns on high-accuracy GPS and records every point while you travel. When you stop again, it drops a fresh circle, switches GPS off, and goes back to sleep.
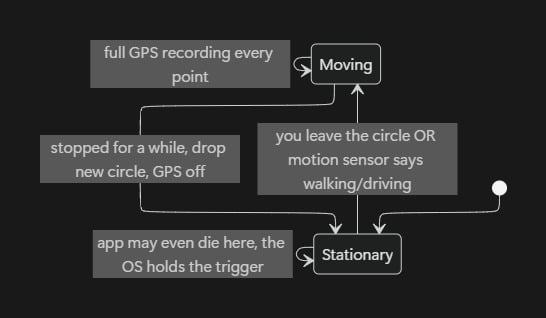
So it is accurate BECAUSE it is lazy. It does not waste GPS while you sit at your desk, which keeps the battery happy, which means the OS does not feel the urge to kill it aggressively, which means it is alive and precise the moment you actually move. Battery saving and accuracy are the same feature here, not a trade off.
Now the part everyone asks about: what happens when the app dies
This is where Android and iOS go in totally different directions. Let me do them one at a time, simply.
Android: a permanent worker plus notes held by the system
While your app is alive in the background, Android keeps it tracking using something called a foreground service. You have seen it. It is that notification that says "App is using your location" which you cannot swipe away. That notification is not annoying-for-no-reason. It is literally the deal you make with Android: "show the user a notification, and in exchange I let you keep running and reading GPS in the background." No notification, no permission. That is the rule on modern Android.
This foreground service is set to restart itself if Android kills it for memory reasons. So far so good. But what about when your app process is FULLY dead? This is the magic part.
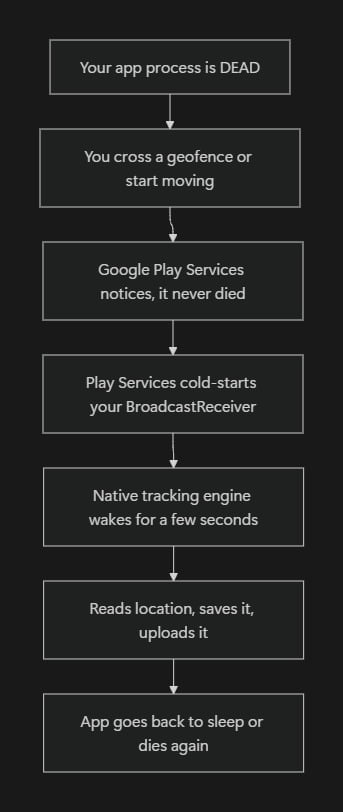
The plugin registers two kinds of "notes" with Google Play Services, which is a separate system app that does NOT die when your app dies:
Geofence triggers. "Hey Play Services, when this phone crosses this circle, wake my app."
Activity Recognition triggers. "Hey Play Services, when this phone goes from still to walking or driving, wake my app."
When one of those conditions happens, Play Services reaches into your dead app and cold-starts a tiny piece of it called a BroadcastReceiver. Your app gets a few seconds of life, the tracking engine wakes up, grabs the location, and does its job. Your Flutter and Dart code can be completely shut down and this still works. That is what people mean by headless mode. The native engine runs without the rest of your app being awake.
And if the phone reboots? The plugin also registers a "on boot" note, so when the phone turns back on, it re-arms everything automatically.
iOS: the system relaunches your app for you
iOS is much stricter. You genuinely cannot run forever in the background, end of story. But Apple gives location tracking one special superpower: a couple of services are allowed to relaunch your app even after it has been force-quit, and even after a reboot. Almost nothing else on iOS can do this.
The two services are:
Region Monitoring, which is iOS's version of geofences. Cross a monitored circle and iOS relaunches your app in the background.
Significant Location Change (SLC), which fires when you move a meaningful distance, detected cheaply using cell towers and wifi instead of GPS.
When one of these fires, iOS quietly relaunches your app in the background, hands it a little flag that says "you woke up because of location," gives you a short moment to act, and then suspends you again. Important detail: plain continuous GPS does NOT survive a force-quit on iOS by itself. So the plugin uses regions and SLC as the "wake me up" layer, and only switches on full precise GPS once it is already awake and senses real movement.
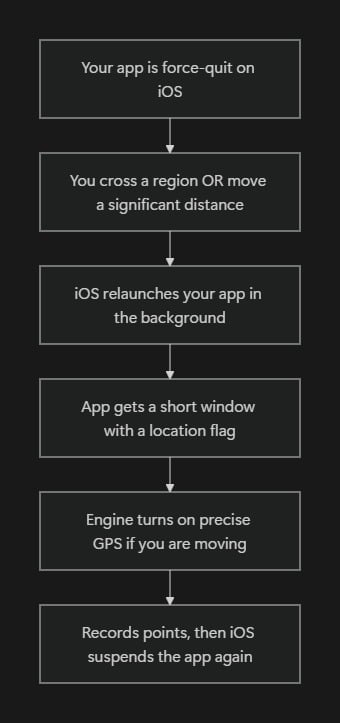
This is also why, on iOS, the very first point after a kill can feel a little delayed. The app had to be relaunched by an event before it could even start tracking.
"Terminated" is not just one thing
A big source of confusion for beginners is treating "closed" as a single state. It is actually a ladder, and behaviour changes at each rung.
| State | What it means | Does tracking survive? |
|---|---|---|
| Backgrounded, still alive | You pressed home, app is in memory | Yes, easily (foreground service on Android, background mode on iOS) |
| Killed by the OS for memory | Phone needed RAM and shut your app | Yes (Android restarts it and geofence/motion triggers revive it, iOS relaunches via SLC/regions) |
| Force-quit by the user | You swiped it out of recents | Android can be harsher and may delay, but Play Services triggers still cold-start a receiver. iOS still relaunches via regions and SLC |
| After reboot | Phone was turned off and on | Yes (Android re-arms with a boot receiver, iOS regions and SLC persist) |
So when someone asks "does it work after the app is closed," the honest answer is "yes, but the mechanism that revives it depends on exactly how it was closed."
The last piece: never lose a single point
Accuracy is not only about capturing locations. It is about not dropping them. What if the phone is in a tunnel, or has no signal, or your server is down for a minute?
The plugin handles this by writing every location into a small local database (SQLite) on the phone FIRST, before doing anything else. Then a separate part of the system tries to upload those saved points to your server. If the upload fails because there is no internet, the points just wait in the local database and get uploaded later, in the correct order, once the connection is back.

Golden rule to copy for any tracking app: record locally first, sync as a totally separate concern. A dead zone should never punch a hole in your track.
The full picture in one diagram
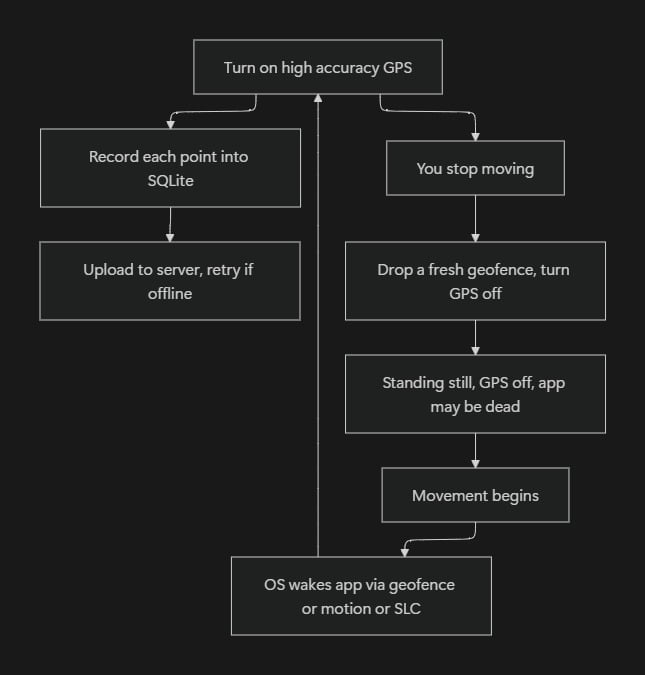
That loop is the entire product. Sleep cheaply, wake on a real signal, track precisely while moving, save everything, repeat.
Step by step: build this yourself in Flutter
This section is a complete walk through using the flutter_background_geolocation package, since that is the battle-tested way to get all of the above without writing the native code yourself. Follow it top to bottom.
Step 0: understand what you are signing up for
This package is free to fully test in DEBUG builds. For a RELEASE build on Android, and for the App Store on iOS, you need a paid license key tied to your app's package id (Android) or bundle id (iOS). So you can build and test everything for free, and only pay when you ship to production. Plan for that.
Step 1: add the package
In your pubspec.yaml:
dependencies:
  flutter_background_geolocation: ^4.16.0
  # the package also needs its companion, added automatically in most cases
Then run flutter pub get. Always check pub.dev for the latest version number rather than copying mine.
Step 2: Android setup
2a. Permissions in AndroidManifest.xml
Inside android/app/src/main/AndroidManifest.xml, above the <application> tag, declare what you need. Each line has a reason:
<uses-permission android:name="android.permission.ACCESS_COARSE_LOCATION" />
<uses-permission android:name="android.permission.ACCESS_FINE_LOCATION" />
<!-- lets you track while the app is in the background -->
<uses-permission android:name="android.permission.ACCESS_BACKGROUND_LOCATION" />
<!-- the permanent notification that keeps you alive -->
<uses-permission android:name="android.permission.FOREGROUND_SERVICE" />
<uses-permission android:name="android.permission.FOREGROUND_SERVICE_LOCATION" />
<!-- detect still vs walking vs driving -->
<uses-permission android:name="android.permission.ACTIVITY_RECOGNITION" />
<!-- re-arm tracking after the phone reboots -->
<uses-permission android:name="android.permission.RECEIVE_BOOT_COMPLETED" />
<uses-permission android:name="android.permission.WAKE_LOCK" />
2b. License key (only needed for release)
Inside the <application> tag, add your license key as a meta-data line:
<meta-data
  android:name="com.transistorsoft.locationmanager.license"
  android:value="YOUR_LICENSE_KEY" />
2c. Gradle repository
The package pulls its native engine from Maven. In most recent versions this is wired up for you, but if a build fails saying it cannot find tslocationmanager, make sure your android/build.gradle (or settings.gradle) has mavenCentral() and the JitPack repo listed under repositories.
Step 3: iOS setup
3a. Info.plist text
In ios/Runner/Info.plist, add the permission descriptions. iOS shows these sentences to the user, so write them in plain language explaining WHY:
<key>NSLocationWhenInUseUsageDescription</key>
<string>We use your location to track field visits while you use the app.</string>
<key>NSLocationAlwaysAndWhenInUseUsageDescription</key>
<string>We track your location in the background to log field activity.</string>
<key>NSMotionUsageDescription</key>
<string>We use motion data to save battery while tracking.</string>
3b. Background modes
Still in Info.plist, switch on the background abilities:
<key>UIBackgroundModes</key>
<array>
  <string>location</string>
  <string>fetch</string>
</array>
You can also enable these by ticking "Location updates" and "Background fetch" under Signing and Capabilities in Xcode.
Step 4: ask for permission the right way
Do not ask for background location on the very first screen. Both stores dislike that and users reject it. Ask for "while in use" first, explain why in your own UI, and only then request "always." The plugin will request what it needs when you call ready, but a gentle in-app explanation screen before that hugely improves acceptance.
Step 5: configure and start tracking (the Dart part)
Here is a minimal but complete setup. Read the comments, they explain each choice.
import 'package:flutter_background_geolocation/flutter_background_geolocation.dart' as bg;

Future<void> initTracking() async {
  // 1. Listen for each new location
  bg.BackgroundGeolocation.onLocation((bg.Location location) {
    print('New location: ${location.coords.latitude}, ${location.coords.longitude}');
  });

  // 2. Listen for the still <-> moving switch
  bg.BackgroundGeolocation.onMotionChange((bg.Location location) {
    print('Moving state changed. isMoving = ${location.isMoving}');
  });

  // 3. Configure the engine
  await bg.BackgroundGeolocation.ready(bg.Config(
    desiredAccuracy: bg.Config.DESIRED_ACCURACY_HIGH, // best GPS while moving
    distanceFilter: 10,            // record a point every 10 meters of movement
    stopOnTerminate: false,        // keep tracking after the app is killed
    startOnBoot: true,             // re-arm after the phone reboots
    enableHeadless: true,          // allow waking with no UI alive
    foregroundService: true,       // the persistent notification on Android
    url: 'https://your-server.com/locations', // where to upload points
    autoSync: true,                // upload automatically
    batchSync: false,              // send points one by one (or batch them)
  )).then((bg.State state) {
    if (!state.enabled) {
      // 4. Actually start it
      bg.BackgroundGeolocation.start();
    }
  });
}
The two settings that make it survive being killed are stopOnTerminate: false and startOnBoot: true. The one that makes it work with no UI is enableHeadless: true.
Step 6: handle the headless wake-up (Android)
When the OS wakes your dead app, your normal Dart code is not running. You register a separate tiny function that the engine can call in that headless moment. Put this at the very top level of your main.dart, outside any class.
// must be a top-level function
@pragma('vm:entry-point')
void headlessTask(bg.HeadlessEvent headlessEvent) async {
  switch (headlessEvent.name) {
    case bg.Event.LOCATION:
      bg.Location location = headlessEvent.event;
      print('Headless location: $location');
      break;
    case bg.Event.MOTIONCHANGE:
      print('Headless motionchange');
      break;
  }
}

void main() {
  runApp(const MyApp());
  // register the headless handler
  bg.BackgroundGeolocation.registerHeadlessTask(headlessTask);
}
The @pragma('vm:entry-point') line is not optional. It tells Flutter not to throw this function away during release optimization, because the engine needs to find it by name when the app is otherwise dead.
Step 7: test it properly
Do not just test by leaving the app open. That proves nothing. Real tests:
Start tracking, then swipe the app out of recents. Walk around the block. Check your server received points.
Reboot the phone without opening the app. Move. Confirm tracking re-armed itself.
Sit still for ten minutes and watch the battery. It should barely move. If GPS is stuck on, your config is wrong.
Turn on airplane mode, move around, then turn internet back on. Confirm the queued points upload in order.
Step 8: survive the cheap-phone problem (very important in India)
Many budget Android phones (Xiaomi, Oppo, Vivo, Realme and others) run aggressive "battery saver" software that kills background apps no matter what the rules say. This is the number one reason field-tracking apps fail in the real world here. Defenses:
Guide the user to disable battery optimization for your app. The plugin has a helper,
bg.DeviceSettings, that can open the right settings screen.For company-owned devices, look into Android Device Owner or a managed enrollment. When your app is the device owner, the OEM battery killers no longer apply, and force-quit and optimization simply stop being a problem. For a controlled fleet like field agents, this is the most reliable answer by far.
Always show the user a clear one-time screen explaining they must allow background location and turn off battery optimization, or tracking will be unreliable.
Quick mental checklist
The app is meant to die. Plan for resurrection, do not fight it.
Sleep with GPS off behind a geofence. Wake on geofence exit or motion.
Android revives via a foreground service plus Play Services geofence and activity triggers, re-armed on boot.
iOS revives via Region Monitoring and Significant Location Change, which can relaunch even after force-quit.
Save every point to local SQLite first, upload as a separate retrying step.
stopOnTerminate: false,startOnBoot: true,enableHeadless: trueare the three settings that matter most.On cheap Android phones, defeat the OEM battery killer or your tracking dies silently.
When does the foreground service actually show up? (clearing the confusion)
This part confuses almost everyone, so let us nail it down. First, remember one thing: that notification IS the foreground service. They are the same thing wearing two faces. Notification visible means the service is running. Notification gone means the service has stopped.
When it starts
The foreground service starts only when the app is actively tracking, which means when the person is in the MOVING state. The flow looks like this:
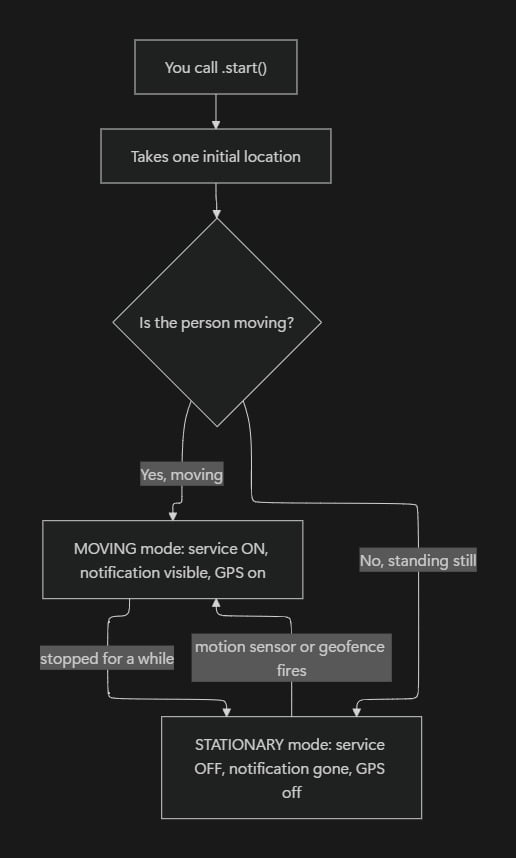
So the notification is not meant to be visible all the time. It comes and goes depending on whether the person is moving. This is not a bug. It is deliberate, to save battery. When the person is sitting still, both GPS and the service shut down, the phone sleeps, and the battery is safe.
If it stops (notification disappears), is that a problem?
No. This is the real source of the confusion. The notification disappearing does NOT mean tracking has died. It only means the app has gone to sleep (stationary mode). The operating system still holds the two triggers, the geofence and the motion trigger. The moment the person moves again, the OS wakes the app, the service starts again, and the notification comes back.
| Notification state | What it actually means |
|---|---|
| Visible | The app is actively tracking with GPS (moving) |
| Gone | The app is asleep (stationary), waiting for a trigger. Tracking is NOT dead |
So during testing, if you notice the notification vanish, do not panic. Move around and it will reappear. Tracking is still alive the whole time, it is just sleeping cheaply.
If you want the notification to stay visible always
If you do not like this come-and-go behavior and prefer the user to always see that tracking is on, the plugin can be configured so the foreground service runs continuously the entire time tracking is enabled. Then the notification stays permanent. The trade off is more battery usage.
So there are two modes to choose between:
Battery friendly: notification appears only while moving. Best battery life.
Always visible: notification stays up the whole time tracking is enabled. More transparent and more reliable on aggressive phones, but uses more battery.
One caution: on newer Android (12 and above) Google restricts starting a foreground service from the background, so the exact come-and-go behavior can vary a little by Android version and plugin version. The plugin handles this internally, but always test on your real target phones to confirm the notification behaves the way you expect.
When does the foreground service start, and is it a problem if it stops?
This part confuses almost everyone, so let us settle it cleanly. First, the single most important fact:
That notification IS the foreground service. They are the same thing in two forms. Notification visible means the service is running. Notification gone means the service has stopped. There is no hidden third state.
When does it start?
The foreground service starts only when the plugin is actively tracking with GPS, which is when the person is in the moving state. It does not run all the time. Here is the lifecycle:
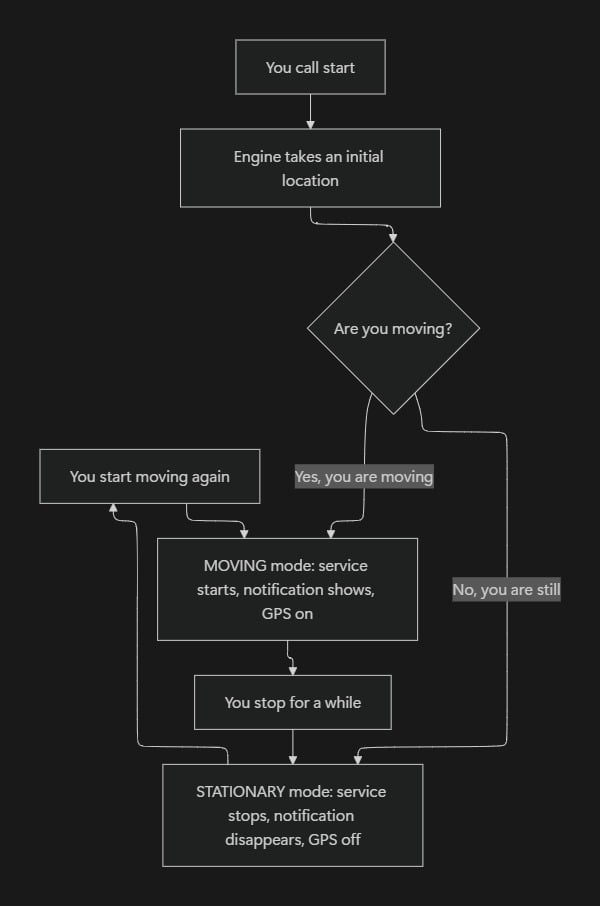
So the notification naturally comes and goes depending on whether the person is moving. This is not a bug. It is deliberate, and it is exactly how the battery gets saved. When the agent is sitting still, both GPS and the service shut down, the phone sleeps, and almost no battery is used.
Is it a problem when the notification disappears?
No. This is the key point that causes the confusion. The notification disappearing does not mean tracking has died. It only means the app has gone to sleep in stationary mode. The two wake-up triggers (the geofence and the motion sensor) are still armed and held by the operating system. The moment the person moves again, the OS wakes the app, the service restarts, and the notification comes back on its own.
| Notification state | What it actually means |
|---|---|
| Visible | App is actively tracking with GPS (moving) |
| Gone | App is asleep (stationary), waiting for a trigger, tracking is NOT dead |
So during testing, if you see the notification vanish while standing still, do not panic. Move around and it will reappear. Tracking was alive the whole time, just sleeping cheaply.
If you want the notification to stay visible all the time
If this come-and-go behaviour is not what you want, and you would prefer the user always sees that tracking is on, the plugin can be configured to keep the foreground service running continuously for as long as tracking is enabled. The notification then stays permanent. The trade-off is higher battery usage.
So you are choosing between two modes:
Battery-friendly mode: notification appears only while moving, disappears while still. Best battery life.
Always-on mode: notification stays visible the entire time tracking is enabled. Higher battery use, but more transparent and more resistant to being killed.
One caveat worth knowing: on newer Android (12 and above) Google restricts starting a foreground service from the background, so the exact behaviour depends on the Android version and plugin version. The plugin handles this internally, but always test on your real target devices to confirm the notification behaves as expected.
A different way real apps do this (a teardown story)
Everything above uses flutter_background_geolocation, which is the gold standard. But when you actually pull apart other tracking apps in the wild, many of them do NOT use it. They build a simpler version by hand. It helps to understand that version too, because you will meet it far more often than you expect, and it comes with very different trade-offs.
Here is the common pattern you find inside a lot of HR and field-attendance apps once you look under the hood.
There are actually two different ways to build this simpler version. One stays entirely in Dart and leans on the geolocator plugin. The other drops down into native Android and iOS code and talks to Flutter through channels, which hands you far more control and lets you read signals the plugin never surfaces. Let us walk through both, one after the other.
Way 1: The Dart-only approach (the geolocator plugin)
Instead of the clever geofence-sleep engine, these apps use the basic geolocator package to read positions, and wrap it in their own foreground service that simply stays on the whole time tracking is enabled. There is no "sleep behind a geofence" trick. The service starts, holds a wake lock, and streams positions on a distance filter until tracking is turned off.
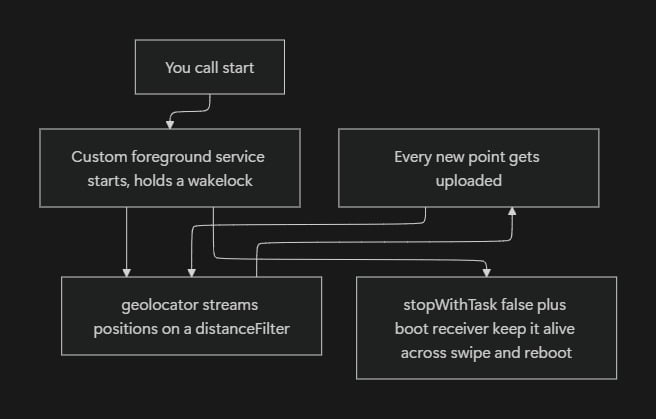
Why do people build it this way? Because it is simple, it has no license cost, and for many use cases you do not actually need the app to survive a full swipe-away for days. You just need reliable tracking during an active shift, which this handles fine.
The trade-offs you must know:
It burns more battery, because GPS and the service run continuously instead of sleeping behind a geofence.
Surviving a hard force-quit is weaker. These apps lean on
stopWithTask=false, a boot receiver and a battery-optimisation exemption, but they do not have the Play Services geofence resurrection trick. So a fully killed process can simply stop until the user opens the app again.It is much easier to reason about and debug, which is a real advantage when you are shipping fast.
Tip
If your tracking only needs to be reliable during a known active window, like a shift, a delivery, or a site visit, the simple always-on service is often the pragmatic choice. Save the full geofence engine for true all-day passive tracking where battery life is the main worry.
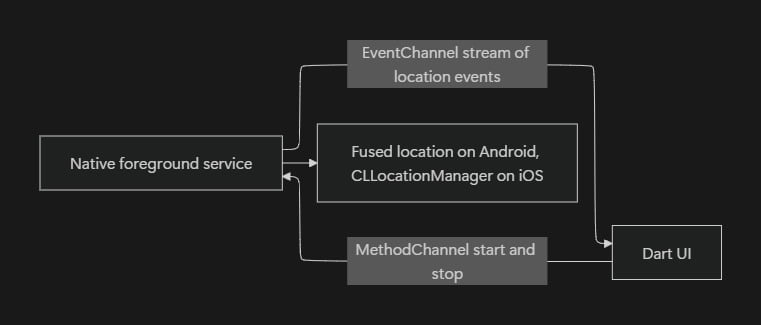
Way 2: The native approach with method and event channels
The Dart-only way is easy, but it can only give you what the plugin chooses to expose. When you want full control, you drop into native code. You write the location logic in Kotlin on Android and Swift on iOS, run your own foreground service, and send the results up to Flutter through a channel. This is the approach a serious field-ops app usually lands on, because the richest signals live in the native layer, not in Dart.
Method channel versus event channel, in one line each
A MethodChannel is a request and a response. Dart calls something like
startTracking, native runs it and replies once. It is made for commands: start, stop, or ask a one-time question.An EventChannel is a continuous stream. Native keeps pushing values, and Dart keeps listening. This is the perfect fit for a live location feed, because points arrive again and again.
The signals you can grab natively, and why they matter
Once you are in native code, each location update can carry much more than latitude and longitude. These are exactly the extra fields that make a track trustworthy and easy to debug:
Speed in metres per second, taken straight from the GPS fix. Handy to catch impossible jumps and to tell walking from driving.
isMocked, the real spoof flag, read right at the source instead of through a wrapper.
Device info like model and manufacturer, so you can spot the cheap OEM phones that love to kill background apps.
Battery level and charging state, so your server understands that a dead battery, not a bug, is why the points stopped arriving.
Bundling all of these into every event turns a plain coordinate into a record you can actually trust.
Android native (Kotlin)
Inside your own foreground service, you use the FusedLocationProviderClient. On each update, you build a map with the extra signals and push it into the EventChannel sink.
// inside your location EventChannel StreamHandler
private val locationCallback = object : LocationCallback() {
    override fun onLocationResult(result: LocationResult) {
        val location = result.lastLocation ?: return

        // read the spoof flag at the source
        val isMock = if (Build.VERSION.SDK_INT >= Build.VERSION_CODES.S) {
            location.isMock              // API 31 and above
        } else {
            @Suppress("DEPRECATION")
            location.isFromMockProvider  // older devices
        }

        // battery level right now
        val bm = context.getSystemService(Context.BATTERY_SERVICE) as BatteryManager
        val batteryLevel = bm.getIntProperty(BatteryManager.BATTERY_PROPERTY_CAPACITY)

        val data = mapOf(
            "latitude" to location.latitude,
            "longitude" to location.longitude,
            "speed" to location.speed,          // metres per second
            "accuracy" to location.accuracy,
            "isMocked" to isMock,
            "deviceModel" to Build.MODEL,
            "manufacturer" to Build.MANUFACTURER,
            "batteryLevel" to batteryLevel,
            "timestamp" to location.time
        )

        // send this event up to Dart
        eventSink?.success(data)
    }
}
iOS native (Swift)
On iOS you use CLLocationManager. The mock story is different here. Plain iOS does not hand you a mock provider flag the way Android does, but from iOS 15 you can check whether a fix was produced by a simulator through the location's sourceInformation.
func locationManager(_ manager: CLLocationManager,
                     didUpdateLocations locations: [CLLocation]) {
    guard let location = locations.last else { return }

    // spoof hint on iOS 15 and above
    var isMocked = false
    if #available(iOS 15.0, *) {
        isMocked = location.sourceInformation?.isSimulatedBySoftware ?? false
    }

    // battery level right now
    UIDevice.current.isBatteryMonitoringEnabled = true
    let batteryLevel = Int(UIDevice.current.batteryLevel * 100)

    let data: [String: Any] = [
        "latitude": location.coordinate.latitude,
        "longitude": location.coordinate.longitude,
        "speed": location.speed,             // metres per second, -1 if unknown
        "accuracy": location.horizontalAccuracy,
        "isMocked": isMocked,
        "deviceModel": UIDevice.current.model,
        "batteryLevel": batteryLevel,
        "timestamp": location.timestamp.timeIntervalSince1970
    ]

    // send this event up to Dart
    eventSink?(data)
}
The Dart side, just listening
On the Flutter side you do almost nothing. You open the same two channels and listen to the stream. All the heavy lifting already happened natively, so Dart only reads a clean event.
class NativeTracking {
  static const _commands = MethodChannel('app/tracking/commands');
  static const _events = EventChannel('app/tracking/events');

  Future<void> start() => _commands.invokeMethod('startTracking');
  Future<void> stop() => _commands.invokeMethod('stopTracking');

  Stream<Map<String, dynamic>> get locationStream =>
      _events.receiveBroadcastStream().map((e) => Map<String, dynamic>.from(e));
}

// usage
final tracking = NativeTracking();
tracking.locationStream.listen((data) {
  if (data['isMocked'] == true) {
    // reject, native already flagged this point as fake
    return;
  }
  print('lat ${data['latitude']}, speed ${data['speed']}, '
      'battery ${data['batteryLevel']}, device ${data['deviceModel']}');
});
Tip
Do the mock check, the speed sanity check, and the device and battery reads in native code, not in Dart. That is where the real signals live, and it means the event that reaches Dart is already clean and trustworthy. The Dart layer should just consume a validated event, not try to police it after the fact.
Which way should you pick?
| You want | Go with |
|---|---|
| Fastest to ship, standard needs | Way 1, the geolocator plugin in pure Dart |
| Full control, richer signals, your own foreground service and spoof logic | Way 2, native code through method and event channels |
Most apps start on Way 1 and move to Way 2 only when they hit a wall, like needing a signal the plugin does not expose, or needing tighter control over the service and the anti-spoof checks.
The piece the earlier sections skipped: stopping fake GPS
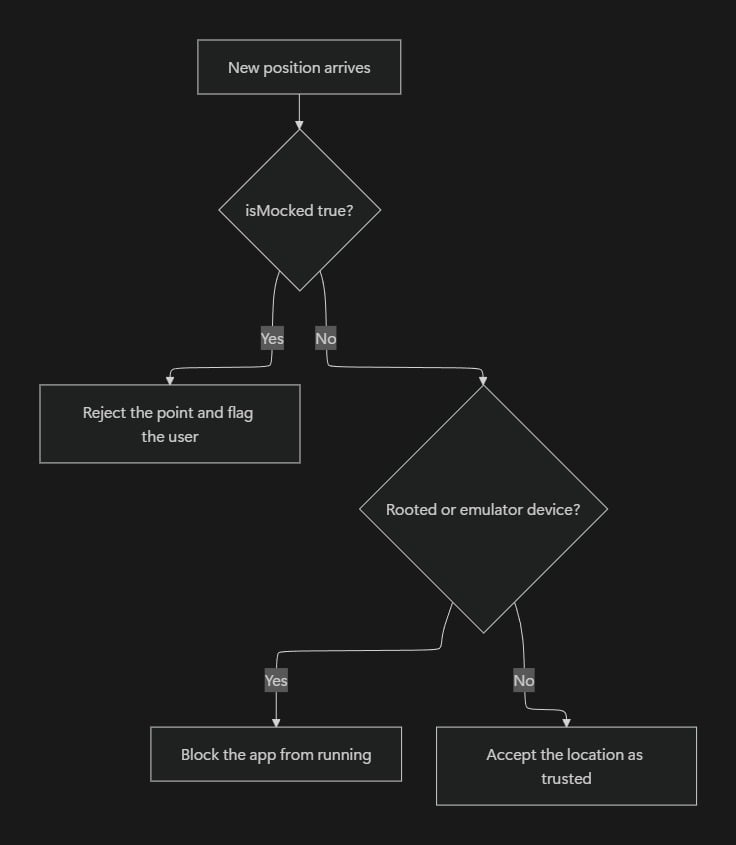
Everything above quietly assumed that the location you receive is honest. In the real world, especially for attendance and field apps, it often is not. An employee can install a fake-GPS app and punch in from home while the map shows the office. If you are building anything where location decides money, like attendance, travel allowance, or delivery proof, you have to defend against this or the whole feature is meaningless.
Every Android location object carries a simple flag that tells you whether it came from a mock provider. In the geolocator package, each Position exposes isMocked. Checking it is the cheapest first line of defence you can add.
import 'package:geolocator/geolocator.dart';

Future<void> readLocation() async {
  Position position = await Geolocator.getCurrentPosition(
    desiredAccuracy: LocationAccuracy.high,
  );

  // Android marks positions that came from a fake GPS app
  if (position.isMocked) {
    // do not trust this point, flag the user and reject it
    print('Mocked location detected, rejecting this point');
    return;
  }

  print('Trusted location: ${position.latitude}, ${position.longitude}');
}
Real apps go further and refuse to run at all on devices that make spoofing easy:
Rooted or jailbroken devices are blocked, because root makes faking location trivial and hard to detect.
Emulators are blocked, since an emulator can report any coordinate you type into it.
Developer Mode being switched on is flagged, because most mock-location apps need it enabled.
Tip
isMockedis necessary but not enough on its own. A rooted device can hide the mock flag entirely. That is why serious apps combine the flag with root and emulator checks, and add a server-side sanity check too, like rejecting impossible speed between two points or a location that jumps across cities in a few seconds. Trust a position only after it clears all of these gates.
Live tracking versus store and forward
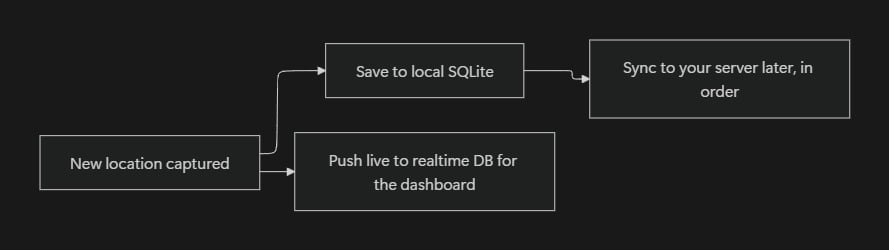
Earlier we said: save every point to SQLite first, then sync it up separately. That is the right pattern for route logging, where you care about a complete and gap-free history.
But some apps have a different need. An admin wants to watch a live map and see field agents move in real time, right now. For that, the store-and-forward queue is too slow. These apps push each position straight into a realtime database, and Firebase Realtime Database is the common choice, so the admin dashboard updates the instant a new point arrives.
| Approach | Best for | Latency | Offline behaviour |
|---|---|---|---|
| Store and forward (local SQLite queue) | Route history, reports, payroll proof | Seconds to minutes | Points wait safely and sync later in order |
| Live push (realtime database) | An admin watching a live map | Almost instant | Needs a fallback, a purely live point can be lost with no connection |
The two are not enemies. A robust app can do both at once: push live for the dashboard, and still keep a local SQLite copy so a dead zone never punches a hole in the recorded history. Live for the eyes, local for the record.
What to copy and what to avoid from real apps
Good ideas worth stealing from apps that ship this successfully:
Check
isMockedon every point and reject mocked ones.Block, or at least flag, rooted and emulator devices for any money-critical tracking.
Consider a live push to a realtime database when someone genuinely needs to watch a map, but keep the local queue as well.
Use
stopWithTask=falseplus a boot receiver so a swipe-away or a reboot does not silently end a shift.
Mistakes worth avoiding, all of which show up in real shipped apps if you look closely:
Shipping cleartext HTTP (
usesCleartextTraffic=true) so that location data travels unencrypted. Always send coordinates over HTTPS.Leaving a developer's local test URL, like an
http://192.168.x.xendpoint, hardcoded in the release build.Hardcoding unrestricted map API keys in the app. Restrict every key by package name and signing certificate, and by the specific API it is allowed to call, or someone will run up your billing.
Trusting the phone's location blindly with no spoof defence at all.
The one line to remember from this teardown
The fancy plugin is not the only way, and it is not always the right way. Pick your architecture from the need. Simple always-on service for a bounded shift, full geofence engine for all-day passive tracking. And whatever you build, if location decides money, never trust a coordinate until it has proven it is not faked.
The third wake-up style: timer-driven periodic sampling
So far the blog has shown two ways an app gets woken up. The geofence and motion approach, where the OS wakes you because you moved. And the continuous foreground service, where you simply stay awake the whole time. There is a third style you will meet in real apps, and it answers a very specific question: "the phone is in deep sleep, but I still want a location every few minutes." This is called timer-driven or periodic sampling, and it is built from two Android pieces working together, SCHEDULE_EXACT_ALARM and WAKE_LOCK.
First, why a normal timer does not work
Your instinct might be to write a simple loop or a Timer that fires every five minutes and grabs a location. In the background this quietly fails, and it is important to understand why.
When the phone goes idle with the screen off, it enters a power saving state called Doze. In Doze the CPU is put to sleep to save battery. While that happens, your app's own timers, Future.delayed calls, and background loops are all frozen. They do not fire until something wakes the CPU. Your app process can even be killed entirely. So a plain "every five minutes" timer inside your app is simply not running when the phone is asleep, which is exactly when you needed it.
The key realisation
Anything that must fire while the phone sleeps cannot live inside your app's own timers. It has to be handed to the operating system, because the OS does not sleep the way your app does. That is what
AlarmManageris for.
Piece one: SCHEDULE_EXACT_ALARM, the part that wakes the phone
AlarmManager is a system service that runs a small piece of your code at a chosen time, whether your app is alive or dead. Think of it as leaving an alarm clock with the operating system instead of trying to stay awake yourself.
There are two flavours, and the difference matters:
A normal (inexact) alarm gets batched and delayed by Doze to save battery. A five minute alarm might actually fire twenty minutes later. For location sampling this is useless.
An exact alarm, using
setExactAndAllowWhileIdle, is allowed to fire on time even in Doze.
To use exact alarms on Android 12 and above (API 31), you must declare the SCHEDULE_EXACT_ALARM permission. Without it the system only gives you the inexact kind. This is exactly why field-tracking apps request it.
A catch worth knowing
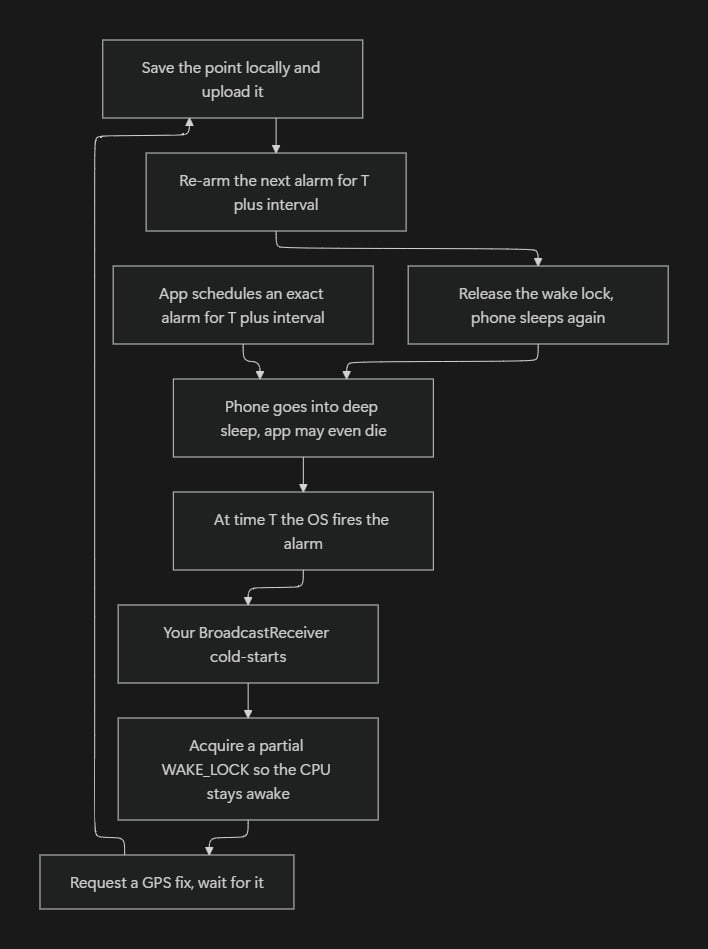
An exact alarm is one-shot. It fires once and forgets. So every time it fires, you must schedule the next one yourself, or the cycle stops after a single tick. The pattern is: wake up, do the work, then set the next alarm before going back to sleep.
Piece two: WAKE_LOCK, the part that keeps the phone awake long enough
Here is the subtle part that trips people up. When your alarm fires, the system gives your BroadcastReceiver only a very short window to run, roughly ten seconds, and it expects you to finish quickly.
But getting a GPS fix is slow and asynchronous. A cold fix can take five to thirty seconds. If you request a location and then let your receiver return, the CPU goes straight back to sleep before the fix arrives. Your location callback never completes, or your upload dies halfway.
The fix is to grab a partial wake lock the moment your receiver runs. A partial wake lock keeps the CPU awake while the screen stays off, using very little battery. You hold it while you request the location, wait for the fix, save it, and upload it. Then you release it so the phone can sleep again.
One line to remember
The alarm wakes the phone at the right second. The wake lock keeps it awake just long enough to finish the job. One is about when, the other is about how long.
The full loop
What it looks like in Kotlin
// 1. Schedule the next wake-up
fun scheduleNextWakeup(context: Context) {
    val am = context.getSystemService(Context.ALARM_SERVICE) as AlarmManager
    val intent = Intent(context, LocationAlarmReceiver::class.java)
    val pi = PendingIntent.getBroadcast(
        context, 0, intent,
        PendingIntent.FLAG_UPDATE_CURRENT or PendingIntent.FLAG_IMMUTABLE
    )
    val triggerAt = System.currentTimeMillis() + 5 * 60 * 1000 // 5 minutes later

    // exact, and allowed to fire even in Doze (needs SCHEDULE_EXACT_ALARM)
    am.setExactAndAllowWhileIdle(AlarmManager.RTC_WAKEUP, triggerAt, pi)
}

// 2. The receiver: stay awake, get a location, re-arm, then sleep
class LocationAlarmReceiver : BroadcastReceiver() {
    override fun onReceive(context: Context, intent: Intent) {
        val pm = context.getSystemService(Context.POWER_SERVICE) as PowerManager
        val wakeLock = pm.newWakeLock(
            PowerManager.PARTIAL_WAKE_LOCK, "app:LocationWakeLock"
        )
        wakeLock.acquire(60_000) // safety timeout, hold at most 60 seconds

        val fused = LocationServices.getFusedLocationProviderClient(context)
        fused.getCurrentLocation(Priority.PRIORITY_HIGH_ACCURACY, null)
            .addOnSuccessListener { location ->
                saveAndUpload(location) // your own save plus upload
            }
            .addOnCompleteListener {
                scheduleNextWakeup(context)          // re-arm the next alarm
                if (wakeLock.isHeld) wakeLock.release() // let the phone sleep
            }
    }
}
Two caveats you must plan for
Doze rate-limits even exact alarms. In deep Doze,
setExactAndAllowWhileIdlewill reliably fire only about once every nine minutes or so. So you cannot get a location every thirty seconds this way. For short intervals or continuous tracking you still need a foreground service. This is why real apps often combine both: a foreground service for dense tracking while the person is active, and alarm-based sampling for occasional check-ins while the phone is idle.Battery optimisation can block it. Requesting
REQUEST_IGNORE_BATTERY_OPTIMIZATIONSand guiding the user to allow it makes these alarms fire far more reliably, especially on the aggressive cheap OEM phones we keep coming back to.
So where does this fit among the three styles?
| Wake-up style | What triggers a location | Best for |
|---|---|---|
| Geofence and motion (the plugin way) | You physically move | All-day passive tracking with great battery life |
| Continuous foreground service | Nothing, it never sleeps | Dense, precise tracking during an active shift |
| Timer-driven periodic sampling | A clock, every few minutes | Occasional check-ins while the phone is idle, cheaper than staying awake |
The takeaway
Exact alarms plus a wake lock are the tool when you want a location on a schedule rather than on movement. The alarm handles when to wake, the wake lock handles staying awake long enough to finish, and you re-arm the alarm on every tick. Just remember Doze will not let you sample faster than roughly every nine minutes, so pair it with a foreground service whenever you need something tighter.
Comments
Join the discussionNo comments yet. Be the first to comment.


